iTask Business Rules
· Home - Page
2. Owner Confirmation Email - New Store
3. Owner Confirmation Email - Existing Store
4. List Stores
· Employee Functions (not logged in)
1. Employee Confirmation Email
3. Log In
1. Switch Store
3. Reporting
§ Show Day's Tasks (admin view)
§ Inactivate Staff (popup)
1. Switch Store
· Clock In
· Complete Task (Popup from Main screen)
Home Page
Allows a user to link to the sign up page for iTask, or to the log in page.
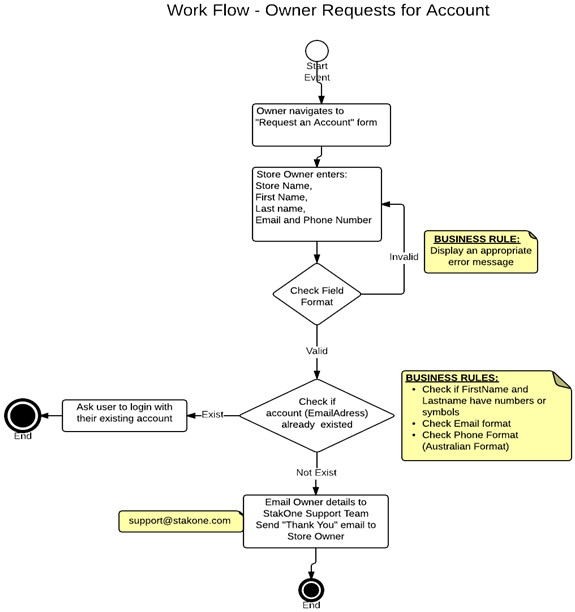
Request an Account
Function Description:
Owner can request an account by phone or email or by filling a request for an account form. Store Owner fills a simple form to request Store account. This form should have the following fields:
_ Store Name
_ First Name
_ Last name
_ Email
_ Phone Number
Validation
_ Rule RO1. Store name shouldn’t include any numbers or symbols except a single hyphen, apostrophe and embedded space.
_ Rule RO2. First name and Last name shouldn’t include any numbers or symbols except a single hyphen, apostrophe and embedded space.
_ Rule RO3. Email format must be valid
_ Rule RO4. Validate phone number as being a valid Australian number.
iTask Admin Functions
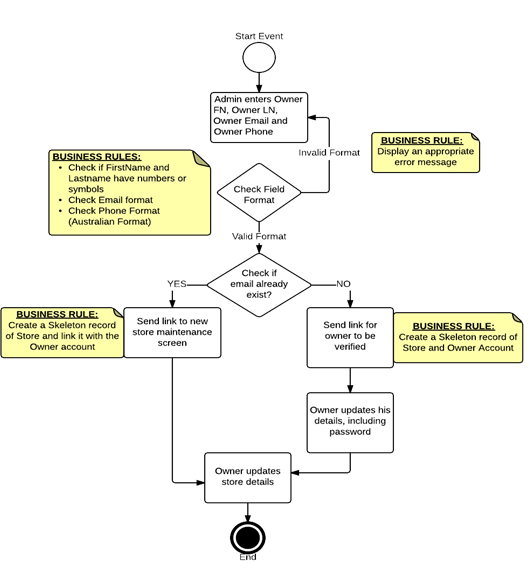
1. Add Store and Owner
Function Description:
Admin creates a new store record by using the “Add Store” function (Available
to admin only). The fields information needed for the Add Store function are:
_ Store Name
_ Owner First Name
_ Owner Last Name
_ Owner Email Address
_ Owner Phone Number
The owner has to contact the admin to create a new account and add a new store. The owner should provide his first and last names, Store name, email address and phone number to the administration while requesting for the new account.
Summary of Business Rules:
Admin will enter owner’s first name, last name, store name, email address and phone number.
Validation
_ Rule SO1. First name and Last name should include only alphabetic characters, a single hyphen, apostrophe or an embedded space.
_ Rule SO2. Email format must be valid.
_ Rule SO3. Check if email address already exists in the database.
_ Rule SO4. Validate phone number as being a valid Australian number.
If owner email exists
_ Rule SO5a. Show a message with owner name and ask admin to confirm to link new store with the existing account. On confirming, create a new skeleton (unconfirmed) record for the store and link it to the existing owner account.
_ Rule SO5b. Send a confirmation email to the owner with an encrypted link through which the owner can update the new store details.
If owner email does not already exist:
_ Rule SO6a. System should ask Admin to confirm to creating a new account.
_ Rule SO6b. Create a new skeleton (unconfirmed) record for the owner and store.
_ Rule SO6c. Send an encrypted email to the owner asking for the confirmation (with confirmation link).
2. Owner Confirmation Email (New Store)
If the owner confirms the account by clicking the email link:
_ Rule SO7a. A new store record should be created, and the owner should automatically be linked to the new store record.
_ Rule SO7b. If the owner record did not previously exist, prompt to update the account details where personal/contact details, password and PIN can be entered. The owner will automatically be directed to the “new store” function.
_
Rule SO7c. Prompt to update the new store details (address
etc.). See separate business rules for store details.
If the owner clicks the link after 48 hours (clicks on the expired link):
_ Rule SO8: Owner should get a notification stating that “ The link is expired, contact the Admin to recreate (re-invite) the account”.
3. Owner Confirmation Email (Existing Store)
If the owner confirms the account by clicking the email link:
_ Rule SO9a. The owner should automatically be linked to the existing store record.
_ Rule SO9b. If the owner record did not previously exist, prompt to update the account details where personal/contact details, password and PIN can be entered.
If the owner clicks the link after 48 hours (clicks on the expired link):
_ Rule S10: Owner should get a notification stating that “ The link is expired, contact the Admin to recreate (re-invite) the account”.
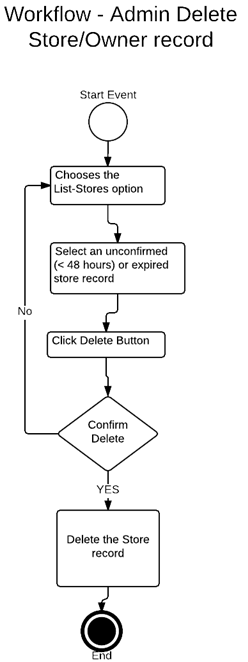
4. List Stores
_ Rule AL1: Admin should be able to list all the stores
_ Rule AL2: An active, confirmed store will be able to be viewed
_ Rule AL3: An inactive store (one which has not been confirmed in response to an email) will be able to be deleted or reinvited.
View Store
_ Rule AL3: Any store (confirmed or not) will be able to be viewed
_ Rule AL4. An administrator will be able to modify a store’s details
Delete Store
_ Rule DS1: The administrator should be able to delete any stores where the invitation is expired or unconfirmed.
_ Rule DS2: The user will be required to confirm the deletion of a store record
Reinvite Store and Owner
_ Rule RS1: The administrator should be able to reinvite any stores where the invitation is expired or unconfirmed.
_ Rule RS2: Details of the previous invitation will be shown, and will be able to be reentered
Inactivate Store
_ Rule IS1: The administrator should be able to inactivate any stores where the invitation has been confirmed.
_ Rule IS2: The user will be required to confirm the inactivation of a store record
_ Rule IS3: An inactivated record will be able to be viewed, but will not be able to have any actions recorded against it.
_ Rule IS4: No staff will be able to switch to an inactive store. Any staff member associated only with inactive stores will be inactivated.
Employee Functions (not logged in)
1. Employee Confirmation Email
If the employee confirms the account by clicking the email link:
_ Rule SO9a. If the employee record did not already exist, the employee will be prompted to fill in details.
If the employee clicks the link after 48 hours (clicks on the expired link):
_ Rule S10: The employee should get a notification stating that “The link is expired, contact the Admin to reinvite you”.
2. Welcome email
_ Rule S11. If the employee record previously existed (for another store), the employee will receive the welcome email, and will not be prompted to fill in employee details
3. Log In
The employee will be prompted to enter user name and password.
· Rule LI01: If the user id and password do not match the details on the system, the user will not be logged in
· Rule LI02: If four unsuccessful attempts are made to enter a password for one user ID, regardless of time span, the user will be locked out. A successful login will reset this count. The user will need to request a “forgot password” if locked out.
If the password has not changed for the last six months, after logging in, the user will receive a message that the password has expired, and will be prompted to change password- see the Reset Password function.
4. Forgot Password
If the user forgets the password, they should be able to set up a new password by clicking the forgotten password button.
Rule CP6: The user must be prompted to enter their email address.
Rule CP7: A link should be sent to the user’s email through which they can set up a new password.
Rule CP8: By clicking on the link, user should be redirected to reset password page.
5. Reset Password
The user is directed to this page when they have asked for a password reset.
Owners and staff should be able to set up a password after confirming the new account. When users click on the confirmation link, they will be redirected to “update account details/ edit staff profile” pages where they can set up a new password.
Note: A password is only valid for 6 months
Note: A new password should be different from previous two passwords.
Rule PW1: Password must contain at least 8 digits.
Rule PW2: A valid password should contain at least one uppercase/ one lower case and one number.
Rule PW3: There should be a re-enter/confirm password field.
Rule PW4: Both the password and re-enter password fields must be entered.
If both fields do not match:
Rule PW5: Display an error message.
If both fields match:
Rule PW6: Set the new password for the user.
Store Admin Functions
1. Switch Store
Description: Switch store function enables the admin or a staff member to switch stores (if they belong to more than one store).
Business Rules:
· Rule SWSTR1: Switch store function must only be shown to a person who belongs to more than one active store.
· Rule SWSTR2: The person will only be able to access the information of the currently active store.
· Rule SWSTR3: The person will be able to switch to any active other store they belong to.
· Rule SWSTR4: If the person’s role changes in the new store, the menu options available will also change to reflect the new role.
2. Administration
Create Message
Owner will be able to send messages to the active employees. These messages will be shown to the staff after they log into iTask.
Whenever an employee enters a PIN to access the task list, or when the employee is logged into the staff functions, the same message will be displayed until the employee marked it as acknowledged.
Owner can select any staff member from the staff list or all staff by checking the appropriate check boxes.
Business Rules
§ Rule CMSG1: Message field should not be empty.
If empty
§ Rule CMSG2: Display a warning message. (Can not send an empty message)
§ Rule CMSG3: At lease one check box should be checked. (At least one name from the list or all staff)
If not
§ Rule CMSG4: Display a warning message. (Please select at least one staff member to send the message)
If checked
§ Rule CMSG5: Send the message to the selected staff.
Edit Store Profile
Description: This function shows the store profile page with existing information and enables the owner to edit the information if needed. The owner will be able to edit the following information:
· Store Name
· Store Identifier
· Display Picture
· Address Fields
· Phone Number
· Contact Person
· Opening Hours
· Fax
· Store email
· Rank maintenance options
Workflow of Edit Store Profile
Business Rules:
· Rule EDSTR1: All the fields must be checked (data /form validation must be done).
· Rule EDSTR2: The postcode must be numeric and must be four digits.
· Rule EDSTR3: The phone number and fax number should be valid Australian numbers.
· Rule EDSTR4: The Street Address 1 field should not be empty.
· Rule EDSTR5: The City/Suburb field should not be empty and must only contain alphabetic characters, space, hyphen or apostrophe.
· Rule EDSTR 6: The State should be selected from the dropdown list.
· Rule EDSTR7: The store email should be a valid email address.
· Rule EDSTR8: The contact person should be able to be selected from owner or managers, presented alphabetically in surname order.
· Rule EDSTR9: Each end time must be later than start time.
No errors (valid)
· Rule EDSTR9: When saved, display a message saying “Your changes have been saved”
Maintain ranks function (as a part of store maintenance) allows the owner to view/edit/add the roles and their ranks of a store.
Owner, Manager and Staff ranks are created for a store by default.
Any new rank can be a manager or staff level.
Owner can add new role any time.
Business Rules
· Rule MRNK1: Role name field should not be empty
If the owner wants to change the rankings of the current list:
The owner can change (swap) the rankings by dragging the roles up and down (Except owner and manager).
A manager level can perform store maintenance roles, a staff level cannot.
· Rule MRNK2: A rank can be deleted if it has not been used. Once used it can be inactivated.
Add New Store Computer
This function allows the owner to run iTask (tasking module) on the store computer/tablet.
When add new device button has been clicked, a 5-digit code will be generated. The same code needed to be entered on the in-store device by staff/admin using the register store computer function.
This is a one off job, which needs to be done to connect a device for the first time.
A list of devices connected (or waiting for response) will also be shown under this function. The table displays the following information:
· Device name
· Action (owner can remove the device)
· Status
Business Rules:
· Rule ADSC1: When owner hits the “add new device”, a 5-digit code should display in the table with the status “pending” until the device is not connected.
· Rule ADSC2: The code must be alpha numeric.
· Rule ADSC3: The code should be generated automatically and randomly.
· Rule ADSC4: A code must not be repeated.
· Rule ADSC5: When the device is connected, the device name (e.g. IP address) should be displayed in the table. The status should be changed to “connected”.
· Rule ADSC6: Owner should be able remove the connected device using the “action” field from the list.
· Rule ADSC7: The device should remain connected until and unless the owner has disconnected.
Reporting
Show Day’s tasks (Admin View)
This function allows the store owner to view the list of the tasks of a particular day.
The can view the day’s tasks by
entering a date (defaulting to today) and clicking the show tasks button. A
calendar dropdown will be available.
Note: although the prototype shows input using a “type=date”, this is not
robust enough cross browser to use in iTask. A Javascript style calendar
dropdown is preferable.
Unlike the show day’s tasks (Staff view), this function shows all the tasks allocated for that day.
However owner will be able to view particular type of tasks (completed/assignee/priority etc.,) by using the filter.
Business Rules:
§ Rule DTSKA1: Should show all the tasks for that day.
§ Rule DTSKA2: Should allow the owner to view particular type of the tasks by using the filter. Tasks can be filtered by any column except task name and comments
§ Rule DTSKA3: Tasks can be sorted by time scheduled and time completed
§ Rule DTSKA4: Should have a comments field next to each task to display the comments (if any).
§ Rule DTSKA5: Should display the allocated time for the task (Start and finish time) and actual finish time.
§ Rule DTSKA6: Should display the assignee name for the task and the name of the person who actually finished the task.
§ Rule DTSKA7: Should have a special column to display any tasks, which are overdue (incomplete, with the actual time past the scheduled end time).
Show Staff Hours
The owner should be able to view the staff worked hours of any particular period. (E.g. A week or day)
Owner can calculate the staff hours
by entering the start date, end date and clicking the show hours button. A
calendar dropdown will be available.
Note: although the prototype shows input using a “type=date”, this is not
robust enough cross browser to use in iTask. A Javascript style calendar
dropdown is preferable.
A table will be displayed with the following details:
§ Date
§ Day
§ Name of employee
§ Start time
§ Finish time
§ Break start time
§ Break end time
§ Total hours
Business Rules
§ Rule SHRS1: Both the date fields must be selected.
§ Rule SHRS2: Date-from field must be from the past.
§ Rule SHRS3: Date-to field can be past or the present day.
§ Rule SHRS4: The Date-from field must not be newer than the Date-To field.
Show Comments
The owner should be able to view the staff comments of any particular period. This function allows the owner to select the date range to view the comments for that period. Once the owner selects the date range and clicks the show comments button, the comments will be displayed with the following details:
§ Shift name
§ Assignee name
§ Task name
§ Comments
§ Time
§ Done by Name
§ Flag (Status of the task)
Business Rules
§ Rule SCRS1: Both the date fields must be selected.
§ Rule SCRS2: Date-from field must be from the past.
§ Rule SCRS3: Date-to field can be past or the present day.
§ Rule SCRS4: The Date-from field must not be newer than the Date-To field.
Show Unread Messages
This function allows the owner to view the unread messages if any. This function displays the following information:
§ Message
§ Sender Name
§ Names (Acknowledged)
§ Names (Seen/Read)
§ Names (Not Read yet)
* An unread message is a message, which has not read by at least one of the recipients.
Business Rules:
§ Rule SURM1: System should show only the unread messages.
§ Rule SURM2: Should display all the unread messages.
§ Rule SURM3: Only admin (store) should be allowed to use this function
3. Task Management
Creating Tasks (task list)
Create task function is available to admin (store) only. This function allows the admin to
· Create any number of tasks
· Prioritize the tasks
· Set the duration time
· Re order the tasks
· Change the tasks
Note 1: Tasks would be typically created once only.
Note 2: This task list is a master list, not all tasks need to be allocated.
Business Rules:
· Rule CTL1: The task description field should not be empty. If the task field is empty, display an error message (e.g.: task description should be entered).
· Rule CTL2: Priority dropdown menu item should be selected. If not selected, display warning message (please set the priority).
· Rule CTL3: Duration field must be entered.
· Rule CTL4: Duration field must be numeric and must not contain more than two digits.
· Rule CTL5: Duration field must be > 0.
· Rule CTL6: Tasks will be able to be reordered (drag and drop). There should be a visual indication (“drag handle”) that a task can be moved together with its associated properties. Dragging a task will move that task down to another position; other tasks will remain in the same order (ie, tasks will “shuffle up” to fill a space for a task which has been moved out or “shuffle down” to make space for a task which is being moved in). As a task is being moved, it should temporarily display in any position where it can be moved, with the tasks underneath “making way” for a moving task as appropriate.
· Rule CTL7: Tasks will be able to be deleted. Deleting a task will prompt for confirmation. If confirmed, that line will be removed and tasks underneath will be shuffled up.
· Rule CTL8: Clicking on “Add new task” will create a new blank line at the bottom for fields to be filled in.
Allocate Tasks to Groups
The admin will be able to divide the task list in to small groups (categorized groups). This can be done by
· Creating a new group
· Name the group
· Drag and drop the tasks from the task list in to the group.
Workflow of Create Task Group function

Business Rules
· Rule CTG1: Task group must not be empty.
· Rule CTG2: Task group must have a name.
· Rule CTG3: No two groups should have same name.
· Rule CTG4: Groups will be able to be reordered (drag and drop)
· Rule CTG5: Double clicking on a task name will allow the name to be changed
Note: This is generally a one off job for the owner. Owner will be able to modify the groups at any time.
Create Template Library
A template is used to create a default set of task groups, which can be used to quickly create task groups for any given day.
This function allows the owner to
· Create a template for any given day
· Create a template for any combination of days of the week
· Create number of “other" templates (e.g. public holiday, special cleaning..)
· Modify or Delete the current template.
Note: Only one template can exist for any given day. Creating templates would be typically done once only.
Note: Admin should be able to use any template for any day.
Creating tasking template can be done by
· Creating a time sheet template
· Adding a name
· Selecting the day(s) or marking as a special occasion (eg public holidays, special shifts)
Business Rules:
· Rule CTL01: Admin must choose whether template for day(s) or special occasions
· Rule CTL02: If Template for day(s) is selected, at least one day must be selected
· Rule CTL03: If Template for special occasion is selected, no days may be selected.
· Rule CTL04: Template name for day(3) defaults to day(s) entered, but may be overridden
· Rule CTL05: Template name must be entered.
Populate Tasking Templates
Any template from the library can be selected and have tasks allocated, by dragging and dropping from a list of task groups.
Adding the task groups to the template:
· Rule PTT01: Admin should be able to drag and drop the task groups on to the time sheet.
· Rule PTT02: Admin will be able to set the starting time of the task group by dragging and placing it under that particular time.
· Rule PTT03: When a user drops a task group, it will “snap” the starting time to the nearest fifteen minutes, or to the finish time of the previous group if applicable and the finish time is within 10 minutes.
· Rule PTT04: The finishing time of the task group should automatically be set based on the starting time and the task group duration.
· Rule PTT05: Task groups are dropped into a role. No group should be contiguous with a previous group- if a group is dropped on the same row as the group just finished it will be moved to a new line. The new line may be at the top again if it’s not contiguous with a previous group.
· Rule PTT06: Colouring is automatic. Groups should be completely distinguishable from the previous or next five colours.
· Rule PTT07: Groups can be dragged and dropped within the time sheet grid.
· Rule PTT08: The vertical space between horizontal lines (roles) should be sufficient for a group to be dragged and dropped. When a group has been dropped, it may be necessary to expand the vertical space.
· Rule PTT09: Any icon which is draggable should have a “drag handle” shown on the icon.
· Rule PTT10: Whenever an action is completed, check the time from the last save. If it is more than five minutes, display a warning: “Warning: It is more than nn minutes from the time last saved”.
· Rule PTT11: It may be possible to scroll horizontally within the time grid. 24 hours will be available. (possibly the default will be to display 12 hours).
· Rule PTT12: Five different colours will be used, which are cycled. So the first item in the list is colour 1, second is colour 2 ... fifth is colour 5, sixth is colour 1 again. All colours should be soft (pastel), enough to read text clearly.
Create Daily Tasking
The owner can create a new set of daily tasks whenever required. This function can be done by
· Selecting date range
· Selecting the appropriate tasking template for each day (based on the day e.g. weekday or public holiday).
Business Rules
· Rule CDT01: Date range start date defaults to the first date for which no daily template exists
· Rule CDT02: Date range end date defaults to one week after the start date (ie, date range is exactly one week)
· Rule CDT03: Admin must select the date range (one week range from the calendar). If not, display a warning message (e.g. Please select the days to create the task lists)
· Rule CDT04: To date must be after from date
· Rule CDT05: To date may not be more than one month into the future.
· Rule CDT06: When a date range has been selected, the admin is prompted with one line for each date in the date range.
· Rule CDT07: The template name defaults to the template for the day, however any template name may be selected
· Rule CDT08: Admin is prompted to create tasking for any day (when no tasking exists for that day), or to modify tasking for the day
· Rule CDT09: When tasking has been created, control returns to this screen.
· Rule CDT10: Admin must select a template for each day.
Create Tasking for Day
The tasking for the day is automatically populated from the template. The tasking for the day may be modified if required. Once the admin is satisfied, the “publish” button is clicked.
Task groups can be allocated, by dragging and dropping from a list of task groups.
When adding the task groups to the daily tasks, business rules are the same as for Populate Tasking Templates
Once the tasks for the day are created, the owner will be able to publish the week’s task list by clicking the publish button.
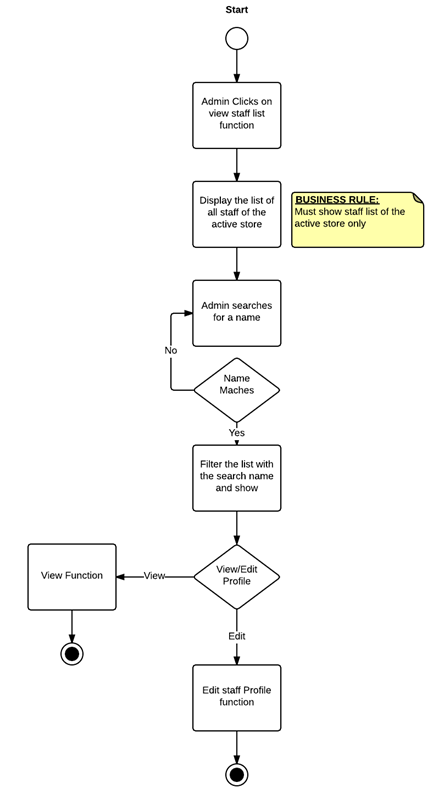
4. Staff List (Admin View)
Description: With staff list (admin view) the owner will be able to view access staff list for the selected store. The Edit function will be enabled in the admin view to edit the staff profile for any staff member.
This function will also display staff details of members with unconfirmed and expired invitations.
Owner will be able to
· View the list of all the staff members:
§ Display picture
§ Name
§ User name
§ Phone number
§ Role
· Search for a staff member by name
· View a staff member from the list
· Edit staff member’s profile
· Delete / Resend the invitation to staff with unconfirmed / expired invitations.
· Inactivate a staff member (not delete, because details still stored, but staff member will not be able to be used again). Ensure that in other functions an inactivated staff member cannot be used.
· Reset a password (Note: login function will require a person to reset a password immediately if somebody else has reset their password).
By default, only active members will be displayed; but it will be possible to show inactive members.
Allow a new staff member to be invited from this screen, although not from the staff list section.
Business Rules:
· Rule SLSTA1: When filter details entered, only show members with names matching the filter. If no matching names, don’t show any rows.
· Rule SLSTA2: The list should be displayed in alphabetic order (staff surname then given name).
· Rule SLSTA3: Allow appropriate actions to be taken for any staff member:
§ Any staff member can be viewed
§ Active staff members can be modified
§ Any unconfirmed or expired members can be reinvited or deleted
§ Any active member can be inactivated
Workflow of Staff List (Admin View)
Invite Staff
The owner is able to invite the staff to the store. The owner needs the first name and email address to send the invitation to the staff.
Invite staff function will be under the staff list (Admin view).
Rule E1: The employee’s email must be checked.
Case 1: If the email already exists in a store which belongs to the same owner:
Rule E2: Ask for the confirmation that an existing employee will be added to the new store.
Case 2: If email does not exist in a store belonging to the same owner:
Rule E3: Send an invitation email to the staff member.
An employee has 24 hours to respond to the invitation. There are three cases in this situation.
Case 1: If the employee did not respond within 24 hours:
Rule E4: The record will be shown as inactive on the owner’s staff list.
Rule E5: Owner should check the email address of the staff member. The owner will be able to correct the email if necessary and resend the invitation to the staff member.
Case 2: If the employee responds the invitation within 24 hours:
Rule E5: The employee should navigate to “edit staff profile” page where he/she can update the personal/contact details and choose a password and a PIN.
Note: Employee’s details can viewed by owner/admin. The PIN and Password are never shown.
Note: A person’s phone number will be shown by default. However, an employee will have the right to make their phone number visible only to the manager/the owner.
Case 3: If the employee clicks the link after 24 hours (clicks on the expired link):
Rule E6: The employee should get a notification stating that “ The link has expired, contact your employer”.
Edit Staff Profile
Description: The edit staff profile function enables the admin to edit the staff’s information. This function shows the staff member profile page with default (existing) information and enables the owner to edit the information if needed.
The admin will be able to edit the following details:
· First Name
· Last name
· Picture
· Username
· Phone number
· Email address
· Possible other info
Workflow of Edit Staff Profile
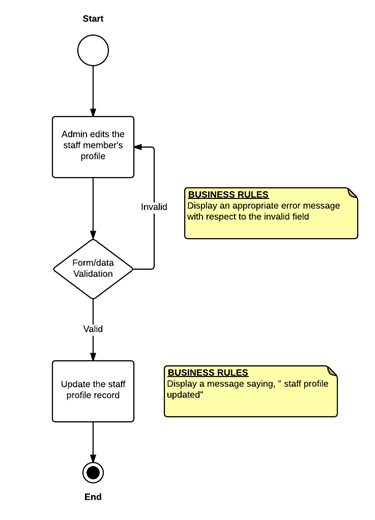
Business Rules:
· Rule EDSTF1: All the fields must be checked (data /form validation must be done).
· Rule EDSTF2: First name field must not be empty and must only contain alphabet characters, space, hyphen or apostrophe. No leading or trailing spaces.
· Rule EDSTF3: Last name field must not be empty and must only contain alphabet characters, space, hyphen or apostrophe. No leading or trailing spaces.
· Rule EDSTF4: Username field must not be empty, and may only have alphabetic, numeric or hyphen. No leading or trailing spaces.
· Rule EDSTF5: Email must be a valid email address.
· Rule EDSTF6: Phone number must be a valid Australian phone number.
· Rule EDSTF7: If any errors, display an appropriate error message with respect to the invalid field.
· Rule EDSTF8: If no errors, display a message saying “ your changes have been saved”
· Rule U1: The username must be unique per one particular owner’s stores.
· Rule U2: Username must be checked. Letters, numbers and hyphens will be allowed.
·
· If the username already exists for that particular owner’s stores:
· Rule U3: Display a messages stating, “ Username is in use, please choose another username”.
Re-Invite Staff
This function allows the owner to re-invite the staff member in the following cases.
· Staff member hasn’t respond to the invitation (link expired)
· Staff member did not get the invitation.
Owner can do this by clicking the staff member name from the staff list.
Business Rules:
· Rule RIST1: The form should contain the staff member’s information by default.
Owner can edit this information.
· The business rules of create staff will apply here.
If all the fields are entered and valid,
· Rule RIST2: Resend the invitation to the staff member.
·
Inactivate Staff
This function allows the owner to inactive a staff member (if the staff member left the job). The inactivate function will:
· Not delete the record.
· Keep the employee’s record and shows inactive in the staff list.
· Not allow the owner to allocate tasks to the inactive staff.
This function will be available to the store admin in staff list function (admin view). When owner clicks the inactivate staff for any particular employee, a form with the details of that employee and a confirm button will appear. The owner can check the details and can click the confirm button.
Business Rules
· Rule INAS1: The form must show the information of that particular employee by default.
· If the owner clicks the confirm button:
· Rule INAS2: The record must not be deleted.
· Rule INAS3: The record must not be shown in the (active) staff list. (Admin view/Staff View)
· Rule INAS4: The record me shown in the (inactive) staff list. (Admin View).
· Rule INAS5: Do not allow the owner to assign tasks to any inactive staff member.
5. Staff Functions
These apply to an employee who is logged in
Switch Store
Description: Switch store function enables the admin or a staff member (if they work in more that one store) to switch stores (if they belong to more than one store).
The person will only be able to access the information of an active store. (Make this a business rule)
Business Rules:
· Rule SWSTR1: Switch store function must only be shown to a person who belongs to more than one store.
· Rule SWSTR2: The person will only be able to access the information of an active store.
View Store Profile
Description: All the staff members can view their store profile. This function allows the staff to view the store information.
The staff will be able to view the following information:
· Store Name
· Address
· Contact Person information
· Phone number
· Opening hours
· Fax
· Store email
Business Rules:
· Rule STPRF1: System must display the store information that the staff member belongs to.
If the person works at more than one store (belongs to same owner)
· Rule STPRF2: Display the store details of the active store.
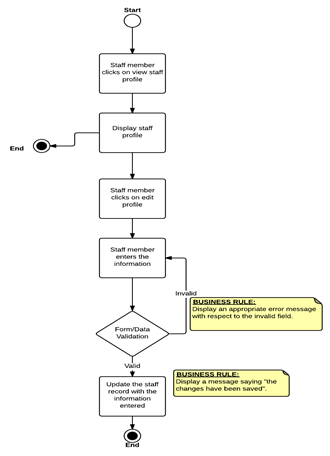
Workflow for View Staff Profile Function
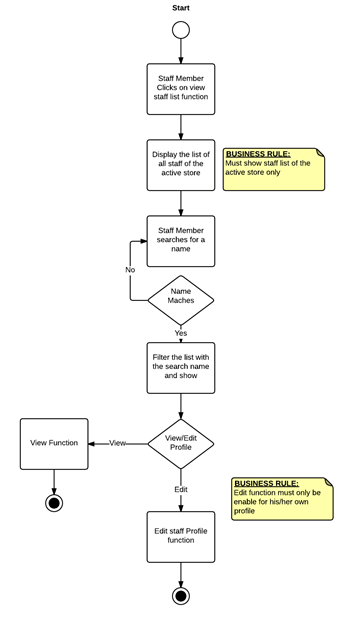
Staff List (staff view)
Description: Staff will be able to view the list of the people work at that particular store.
Staff List function will enable a staff member
· To view the list of all the staff members (same store):
§ Name
§ Display picture
§ Role
§ Phone number
§ User name
· To edit their own profile.
Business Rules
· Rule SLSTS1: System must show the staff list of the active store only (if works at more than one store).
· Rule SLSTS2: The “Edit” button must only be enabled for their own profile, must not be enabled for other staff members.
· Rule SLSTS3: Members will be displayed in alphabetic order- surname first, then given name
· Rule SLSTS4: Only active members will be displayed.
Workflow of Staff List Function (Staff View)
View Staff Profile
Description: Staff will be able to view their own profile and can edit if needed. The view staff profile function will display the following information:
· Staff Member’s Name
· Picture (if any)
· Phone number
An edit button will be enabled in this function.
Business Rules:
Note: When a staff member edits their own information, the business rules for Edit Staff Profile apply EXCEPT that a staff member cannot change their own rank
Show a Day’s Tasks
Clock in
The staff needs to clock-in to view their tasks.
When a staff member clicks on the “clock in” button, a window will be shown with all available active staff names. When they select their name and click “OK”, they will be prompted to enter their PIN.
When the PIN is entered, a check will be made of any messages, which need to be displayed. A message from the owner which has not been viewed, or a message which has been viewed but not acknowledged, will be shown, and the employee will be prompted to acknowledge the message.
When this has been completed,
· Their name will appear under the rank they belong to.
· Can view all the tasks allocated for the day.
· Can click on their name to view their detailed task list.
· Can pickup other people’s tasks if they want to.
· Cannot assign their tasks to others.
· If a task is completed, they can mark that as completed.
Business Rules:
When the staff member clicks on the “clock in” Staff list is available on the in-store device. Staff can clock in by clicking their name and enter the PIN number.
· Rule CLIN1: PIN number field must be checked.
If PIN does not match
· Rule CLIN2: Display an error message saying, “Incorrect PIN, Please try again”.
If PIN is correct:
· Rule CLIN3: Should display the roster with their name showing under their rank.
Complete Task
Business Rules:
After the staff clock in they can see their own tasks and other people’s tasks by clicking on their names.
By default, the task list shows outstanding tasks only. But user can view other tasks by using the filter provided in the table.
· Rule STSK1: Should split the window in to two and should display the detailed task list (only due tasks) on the right hand side and the roster on the left hand side.
· Rule STSK2: Sign off and start break buttons must display on the top of the right hand side window only for their own page.
A staff member can mark a task as completed by clicking on it and entering the PIN.
· Rule STSK3: Must prompt to ask for the PIN number.
If he/she enters a wrong PIN number,
· Rule STSK4: Must not mark the task as completed.
· Rule STSK5: Display an error message saying, “Wrong PIN! Please try again”.
If the PIN is correct
Check for messages for the user. If there are any unacknowledged messages display them. Messages may be acknowledged as read one at a time. A message must be acknowledged before it is no longer shown to the user.
NOTE: This should be done wherever a PIN number is entered.
When any messages (if any) have been read:
· Rule STSK6: Should popup a box to enter any comments.
· Rule STSK7: Should disappear from the default detailed task list.
A group of tasks can be shared between two people.
· Rule STSK8: The task list (group) should be available to both the staff members.
· Rule STSK9: Both of them should be able to mark the tasks as completed.
A person can do other’s tasks but cannot assign their tasks to others.
Note: If a person signs off without completing any tasks, those tasks will be added to another staff member (of the same level) who is still logged in.
Register Store Computer
This function allows the staff/owner to use the iTask (tasking module) in the store by entering the code generated by “add store computer” function by the owner.
Each time the staff started the iTask portal at the store, the device will be checked. If the device is already connected, the tasking is initiated. Otherwise it will ask to register the computer where they need to enter the 5-digit code generated by the “add store computer”. Once the code has entered, the tasking will be initiated.
Business Rules:
· Rule RGSC1: Each time the staff started the iTask at the store, the device must be checked (checks the cookie).
If connected
· Rule RGSC2: The tasking should be initiated.
If not connected
· Rule RGSC3: Should popup the “register store computer” function.
· Rule RGSC4: Staff needs to enter the 5-digit code generated by the owner.
If the code is incorrect
· Rule RGSC5: Display an appropriate warning message.
If the code is correct
· Rule RGSC6: Display a message saying “device connected successfully”, and initiate the tasking.